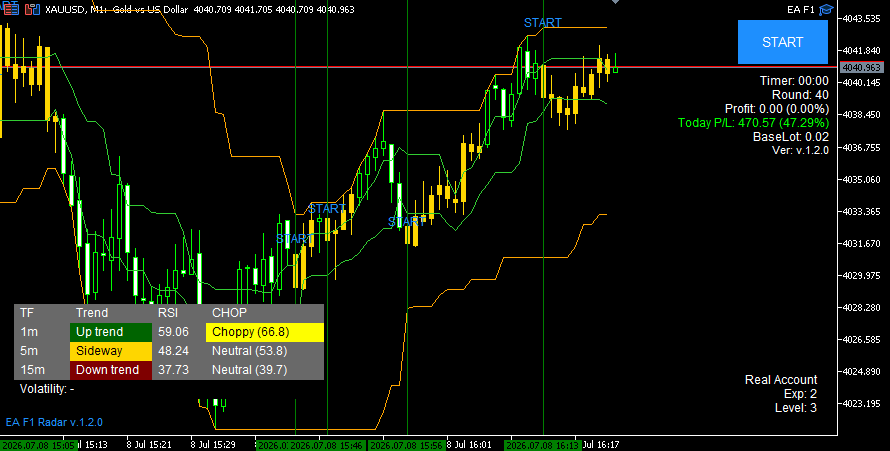

EA F1
Auto → Yellow bar → START → Let profits run with the structure
EA F1 v1.9.6 simplifies decision-making. There is no need for a Pre-Trade Checklist or a Playbook selection before trading. Simply enable Auto Mode, wait for the signal bar to turn yellow, then press START.
From multiple conditions to one straightforward workflow
Version 1.9.6 makes the workflow simpler. No Playbook selection or Pre-Trade Checklist is required. Enable Auto Mode and wait for the signal bar to turn yellow. Then press START and manage profits according to the price structure.
Download and install EA F1
Watch the video to learn how to download, install, and get started with EA F1 before using it in live trading.

What is EA F1?
EA F1 is a trading assistant developed from the KZ AI Reactor F1 family, simplifying operation into a clear workflow for live trading.
The core idea behind EA F1 v1.9.6 is to minimize the steps required. There is no need to select a Playbook or check multiple conditions before entering a trade. Simply enable Auto Mode, wait for a yellow signal bar, then press START to let the system work with the current market direction and price structure.
EA F1 v1.9.6 · INPUTS
Inputs settings explained
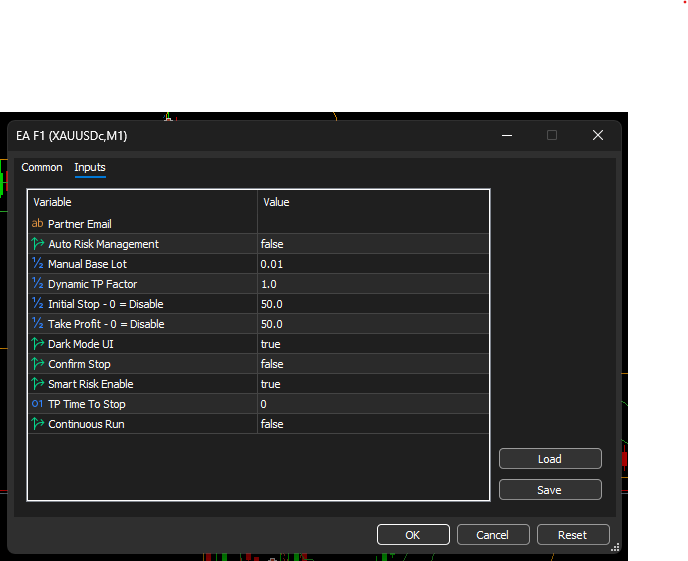
Understand the settings before pressing START: set your Lot manually, or let the EA calculate Lot, Initial Stop, and Take Profit from Balance when Auto Risk Management is enabled.
What each Input means
This setup uses a Manual Lot of 0.01 with Auto Risk Management turned off. The user decides when to start each trading cycle.
- Partner Email
- User email
Enter the partner or user email if the system checks access rights or links the EA to an account.
- Auto Risk Management
- false
Turns automatic risk management off. The EA will not automatically adjust Lot to the account funds and will use the specified Manual Base Lot.
- Manual Base Lot
- 0.01
Sets the starting Lot manually. This setup uses 0.01 lot.
- Dynamic TP Factor
- 1.0
The Dynamic Take Profit multiplier. A value of 1.0 uses the standard setting. Values below 1.0 reduce the TP distance according to the system logic.
- Initial Stop – 0 = Disable
- 50.0
Sets the initial Stop for the system. This setup uses 50. Entering 0 disables Initial Stop.
- Take Profit – 0 = Disable
- 100.0
Sets the Take Profit target. This setup uses 100. Entering 0 disables Take Profit.
- Dark Mode UI
- true
Enables the EA’s Dark Mode interface. It does not affect trading logic.
- Confirm Stop
- false
Turns Stop confirmation off. When set to true, the system applies its configured confirmation conditions before stopping.
- Smart Risk Enable
- true
Enables Smart Risk, using internal logic to help manage risk and Stop conditions according to the EA’s rules.
- TP Time To Stop
- 0
Sets the time for the Time To Stop function. This setup uses 0, which disables the function.
- Continuous Run
- false
Turns automatic continuous operation off. The system will not start a new cycle automatically after a cycle ends.
This setup at a glance · Manual / Semi-Auto
- Manual Lot0.01 lot
- Initial Stop50
- Take Profit100
- Smart RiskON
- Auto RiskOFF
- Continuous RunOFF
Designed for using EA F1 in Semi-Auto operation. The user decides when to press START, then the EA helps manage positions and risk according to its logic. It does not automatically start another cycle when the current one ends.
When Auto Risk Management = true
The EA recalculates Lot when you press START based on the account Balance at that moment and uses the unit count to calculate Initial Stop / Take Profit for that cycle.
1. Convert Balance into units
- Balance from 0 to below 2,000 = 1 unit
- Balance from 2,000 to below 3,000 = 2 units
- Balance from 3,000 to below 4,000 = 3 units
- The unit count then increases with each additional 1,000 in Balance.
Base Lot = 0.01 × number of units
| Balance | unit | Base Lot |
|---|---|---|
| 1,500 | 1 | 0.01 lot |
| 2,500 | 2 | 0.02 lot |
| 5,200 | 5 | 0.05 lot |
2. GREEN / RED may increase Lot based on KZ8 at START
After calculating Base Lot from Balance, if the cycle starts in GREEN or RED, the system applies the following KZ8 multiplier.
| KZ8 | GREEN / RED | BLUE |
|---|---|---|
| ≤ 1.49 | ×3 | ×1 |
| 1.50–1.99 | ×2 | ×1 |
| ≥ 2.00 | ×1 | ×1 |
BLUE uses ×1 based on Balance. It does not apply the GREEN / RED Lot increase multiplier.
Example: Balance 2,500 → 2 units → Base Lot 0.02. For GREEN / RED with KZ8 = 1.40, the Lot at START is 0.06 lot, while BLUE still uses 0.02 lot
3. Calculate Initial Stop and Take Profit from units
Initial Stop = 10 × unit
Take Profit = 100 × unit
| unit | Initial Stop | Take Profit |
|---|---|---|
| 1 | 10 | 100 |
| 2 | 20 | 200 |
| 5 | 50 | 500 |
This table applies to Auto Risk = true. The Manual setup above uses Initial Stop = 50 and Take Profit = 100, so read the values for the mode you have selected.
How to use EA F1 v1.9.6
The main workflow is reduced to waiting for a signal, entering a trade, and choosing how to exit the cycle, without switching Playbooks or completing a Checklist before trading.
1. Enable Auto and wait for a yellow bar
Enable Auto and wait for the signal bar to turn yellow. When the yellow bar appears, press START to start the cycle.
2. STOP according to the cycle’s mode
After START, identify whether the cycle is Trend or Sideway, then apply the STOP rules that match the price structure. This keeps exits straightforward with a few memorable conditions.
Why is EA F1 v1.9.6 easier to use?
Version 1.9.6 removes steps that required multiple layers of interpretation. Instead of selecting a Playbook and checking a Checklist before trading, it uses one workflow: Auto → Wait for a yellow bar → START . This makes chart-based decisions faster and easier to repeat.
After entry, apply the STOP rules for the cycle. In Trend mode, use Initial SL = -50 USD / 0.01 as the Hard Stop and the orange line as the Structure Stop. For Sell, STOP after price closes above the upper orange line for 2 consecutive bars. For Buy, STOP after price closes below the lower orange line for 2 consecutive bars. If there have not yet been 2 bars, continue holding. If the loss reaches -50 first, let Initial SL act immediately. For a Blue cycle that started in Sideway, STOP if the market changes to Trend and the cycle is profitable. If it is still at a loss, wait for the system to continue its recovery trades. If Sideway continues, apply this rule: STOP after a 35% giveback from peak profit.
🤖 Auto Mode
The main mode in EA F1 v1.9.6. Enable Auto, wait for the yellow-bar trigger, then press START to begin a cycle.
🟧 Trend Structure Stop
Use Initial SL -50 USD / 0.01 as the Hard Stop, and STOP earlier after price closes beyond the opposite orange line for 2 consecutive bars. If the cycle remains profitable and the structure is still intact, profits can continue running along the green line.
🟦 Blue Auto STOP
If you press START during Sideway and the market changes to Trend, STOP when the cycle is profitable. If it is still at a loss, wait for recovery trades to continue. If Sideway persists and profit falls 35% from its peak, STOP.
EA F1 highlights
- One easy-to-understand workflow Enable Auto, wait for a yellow bar, then press START.
- No Pre-Trade Checklist required Fewer steps before starting a trade.
- No Playbook selection required Operation follows one unified workflow.
- Easy-to-remember STOP rules Trend uses the orange line as a Structure Stop with 2-bar confirmation and Initial SL -50 USD / 0.01 as the Hard Stop. Blue uses the transition from Sideway to Trend and a 35% Profit Trail.
- Use with EA F1 Radar To help read market conditions and key levels before making a decision.
- Suitable for beginners and live streams The on-chart rules are brief, clear, and easy to explain directly from the chart.
How should you get started?
If you are new to EA F1: Enable Auto Mode, wait for the signal bar to turn yellow, then press START. Apply the STOP rules for the cycle. For Trend, remember: Orange line = Structure Stop, 2 bars = Confirmation, -50 USD / 0.01 = Hard Stop . For Blue, remember: Sideway → Trend + profit = STOP . If the cycle is still at a loss, wait for recovery trades. If Sideway continues and profit falls 35% from its peak, STOP.
The goal is to wait for a clear trigger and manage profits according to each cycle’s price behavior, rather than pressing START as often as possible.
How do EA F1 and EA F1 Radar differ?
| Tool | Main function | For |
|---|---|---|
| EA F1 | An EA that helps open and manage orders through Auto Mode and the START system | Traders who want a simple, repeatable workflow |
| EA F1 Radar | An indicator displaying chart information and supporting signals, including the yellow bar used as a trigger | Users who want a clearer view of START timing and price structure |
How does EA F1 differ from KZ AI Reactor F1?
EA F1 focuses on simplicity. Version 1.9.6 reduces operation to Auto Mode, a yellow-bar trigger, and memorable STOP rules for each market condition. Trend uses the orange line as the Structure Stop with 2 consecutive closes beyond it, plus Initial SL -50 USD / 0.01 as the Hard Stop. Blue uses the transition from Sideway to Trend and a 35% giveback from peak profit.
By comparison, KZ AI Reactor F1 is for advanced users who want to experiment or customize the system in depth and can independently manage the risks of different configurations.
Get started with EA F1
Download EA F1 and EA F1 Radar from the link below, then try the workflow Auto → Yellow bar → START → Exit on a demo or low-balance account before using it in live trading.
Risk warning
Trading Forex, Gold, Crypto, and other financial assets involves high risk. Past results or results shown on live streams do not guarantee future performance. Users should first test on a demo or low-balance account and always have a risk management plan.
EA F1 is a trading assistant, not a profit guarantee. Live trading decisions should be based on the user’s own understanding and risk management.